I'm an administrator. How do we get started with Findity?
Table of Contents
Getting started - for Administrators
As a Findity administrator, you can customize the expense processes to suit both you and your company. Whenever you need to, you can change what to include in the expenses process, what the user interface looks like and which users that can do what.
Change between Administrator mode and Private mode
The organization mode for administrators is only available in our web version of Findity.
When you log in to Findity, you will be logged in to your Private mode. To switch to your organization, and Administrator mode, you click on the drop-down list (in the upper left corner of your window) where it says Private mode.
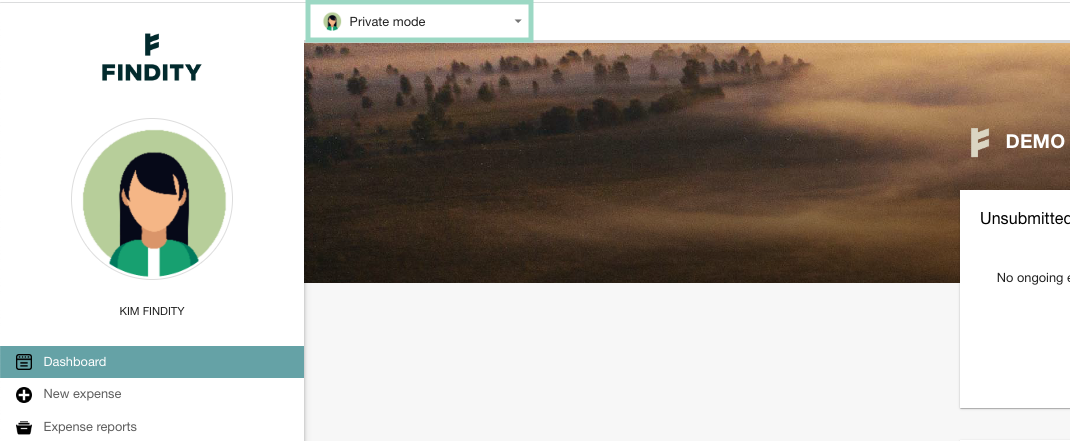
Choose Organization to switch to Administrator mode.
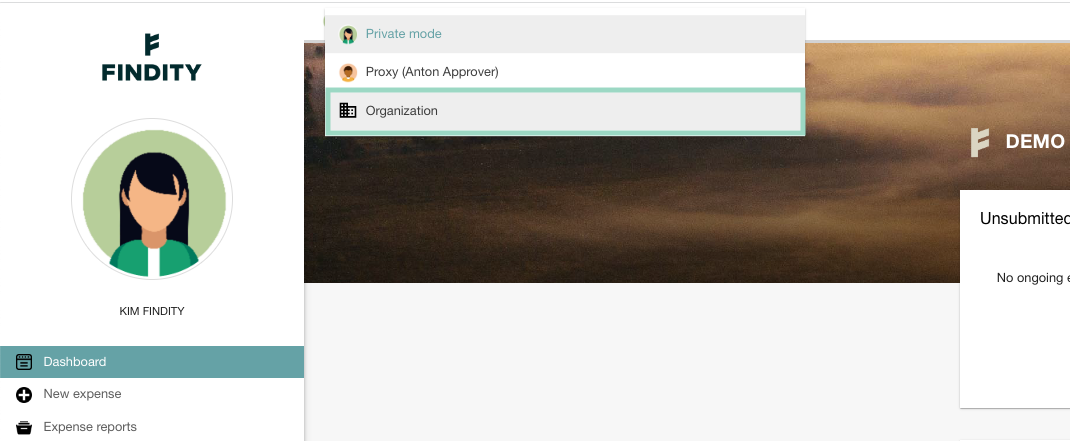
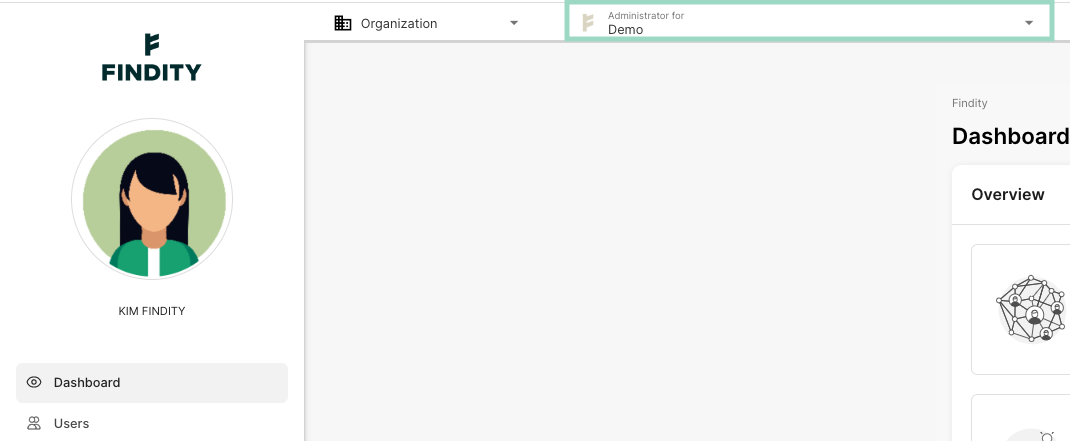
In the organization mode you will see the organizations that you manage in the second drop-down
list in the top of the window.
Managing the expense process
The expense processes depend on which report recipient Findity is linked to. Findity can be integrated with most accounting and payroll systems and you can choose from multiple file formats when generating expense reports. An expense process has a set of default settings that you can edit and customize for your company and you can find these settings by going to Settings.
The following section divided into tabs here below, will provide a brief description of the left-hand-side menu in the Organization mode. For more information about the different functions in the tabs, follow the related links to other articles in the different tabs, explaining more about that function.
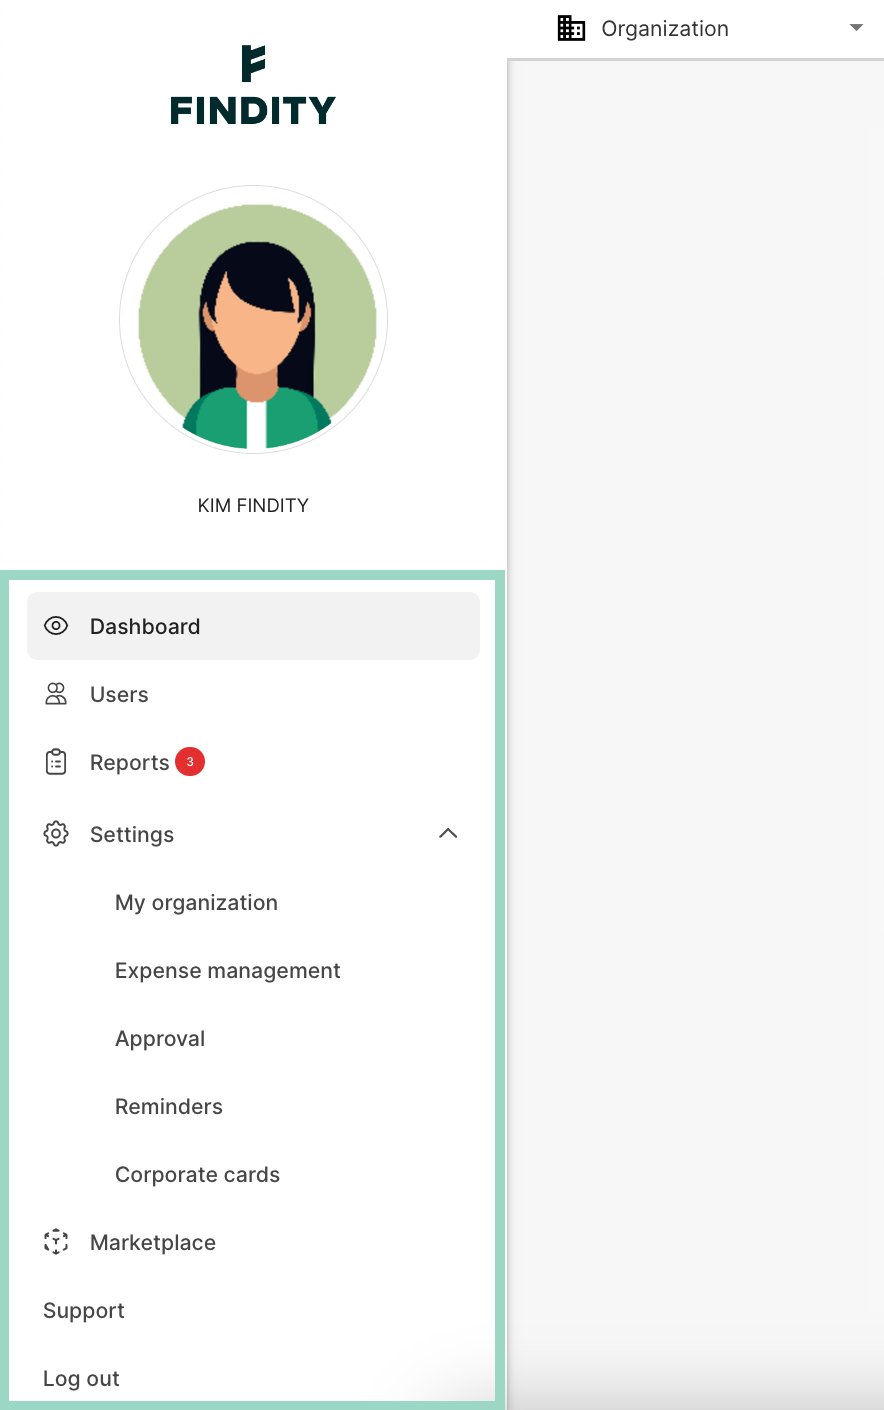
Click on the different tabs below to read more about the categories in the menu.
Dashboard
The Dashboard is the first view you will see after switching to the Organization mode. Here you will find the Overview and Balancing report.
Overview
The Overview will give you a good overview of the data in your organization. In the upper corner to the right, you can change what type of data you want the overview to show. For example - All data will show the total amount of users in the company, reports made, expenses made etc.
Balancing report
Under Balancing report is where you can generate a balancing report for the organization. The report contains all the data for the expense reports that have been submitted since the organization was created in Findity. It is possible to choose to generate a report for a specific period and also to add the unsubmitted reports. Read more about how to generate the report in the article here. 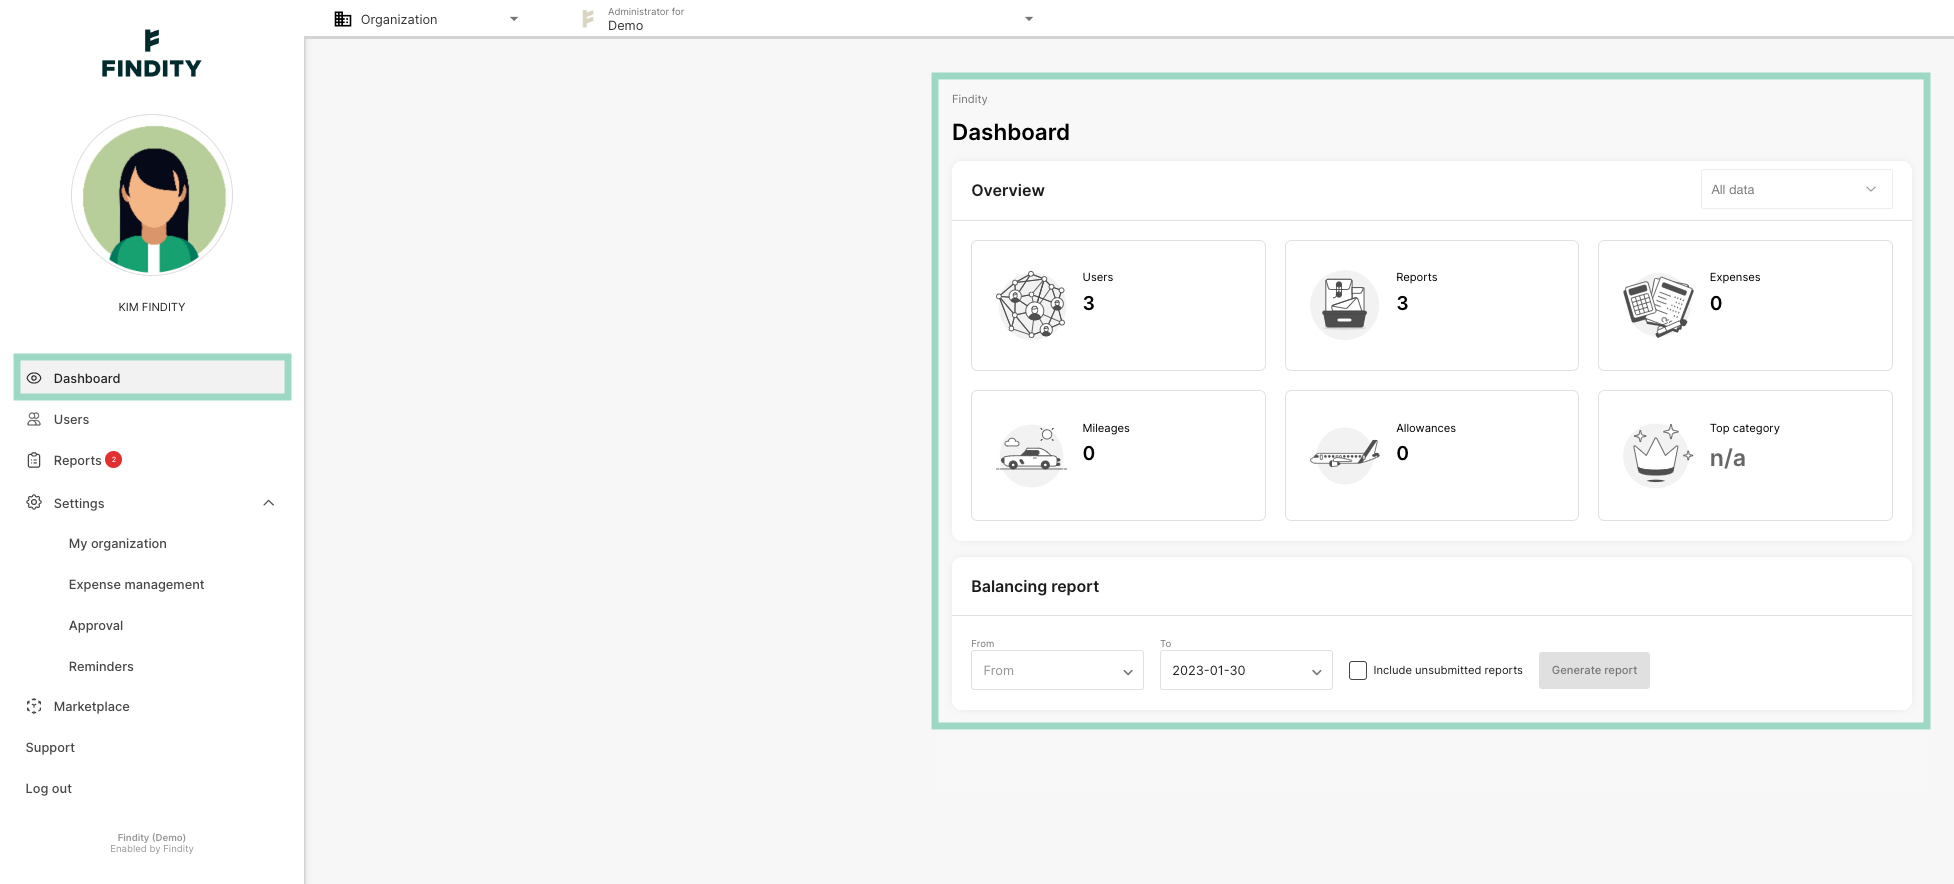
Users
As an administrator, you're the one who is able to add new users and delete users from the organization and it's under the category Users where you can do this. If you have API-keys, this is also where you will be managing this (this tab is only shown if a API connection has been made).
Here you can also see all users assigned to the organization. If your company is registered by a partner (for example that an accounting firm administers the company's accounting), there will be a tab where you see your assigned accounting consultants here.
From Users, is also where you manage, among other things, the user's employee numbers, if they can report expenses for another user and which department they belong to.
In this article you can read more about how you manage users in your organization.
Assign another user Administrator authorizations
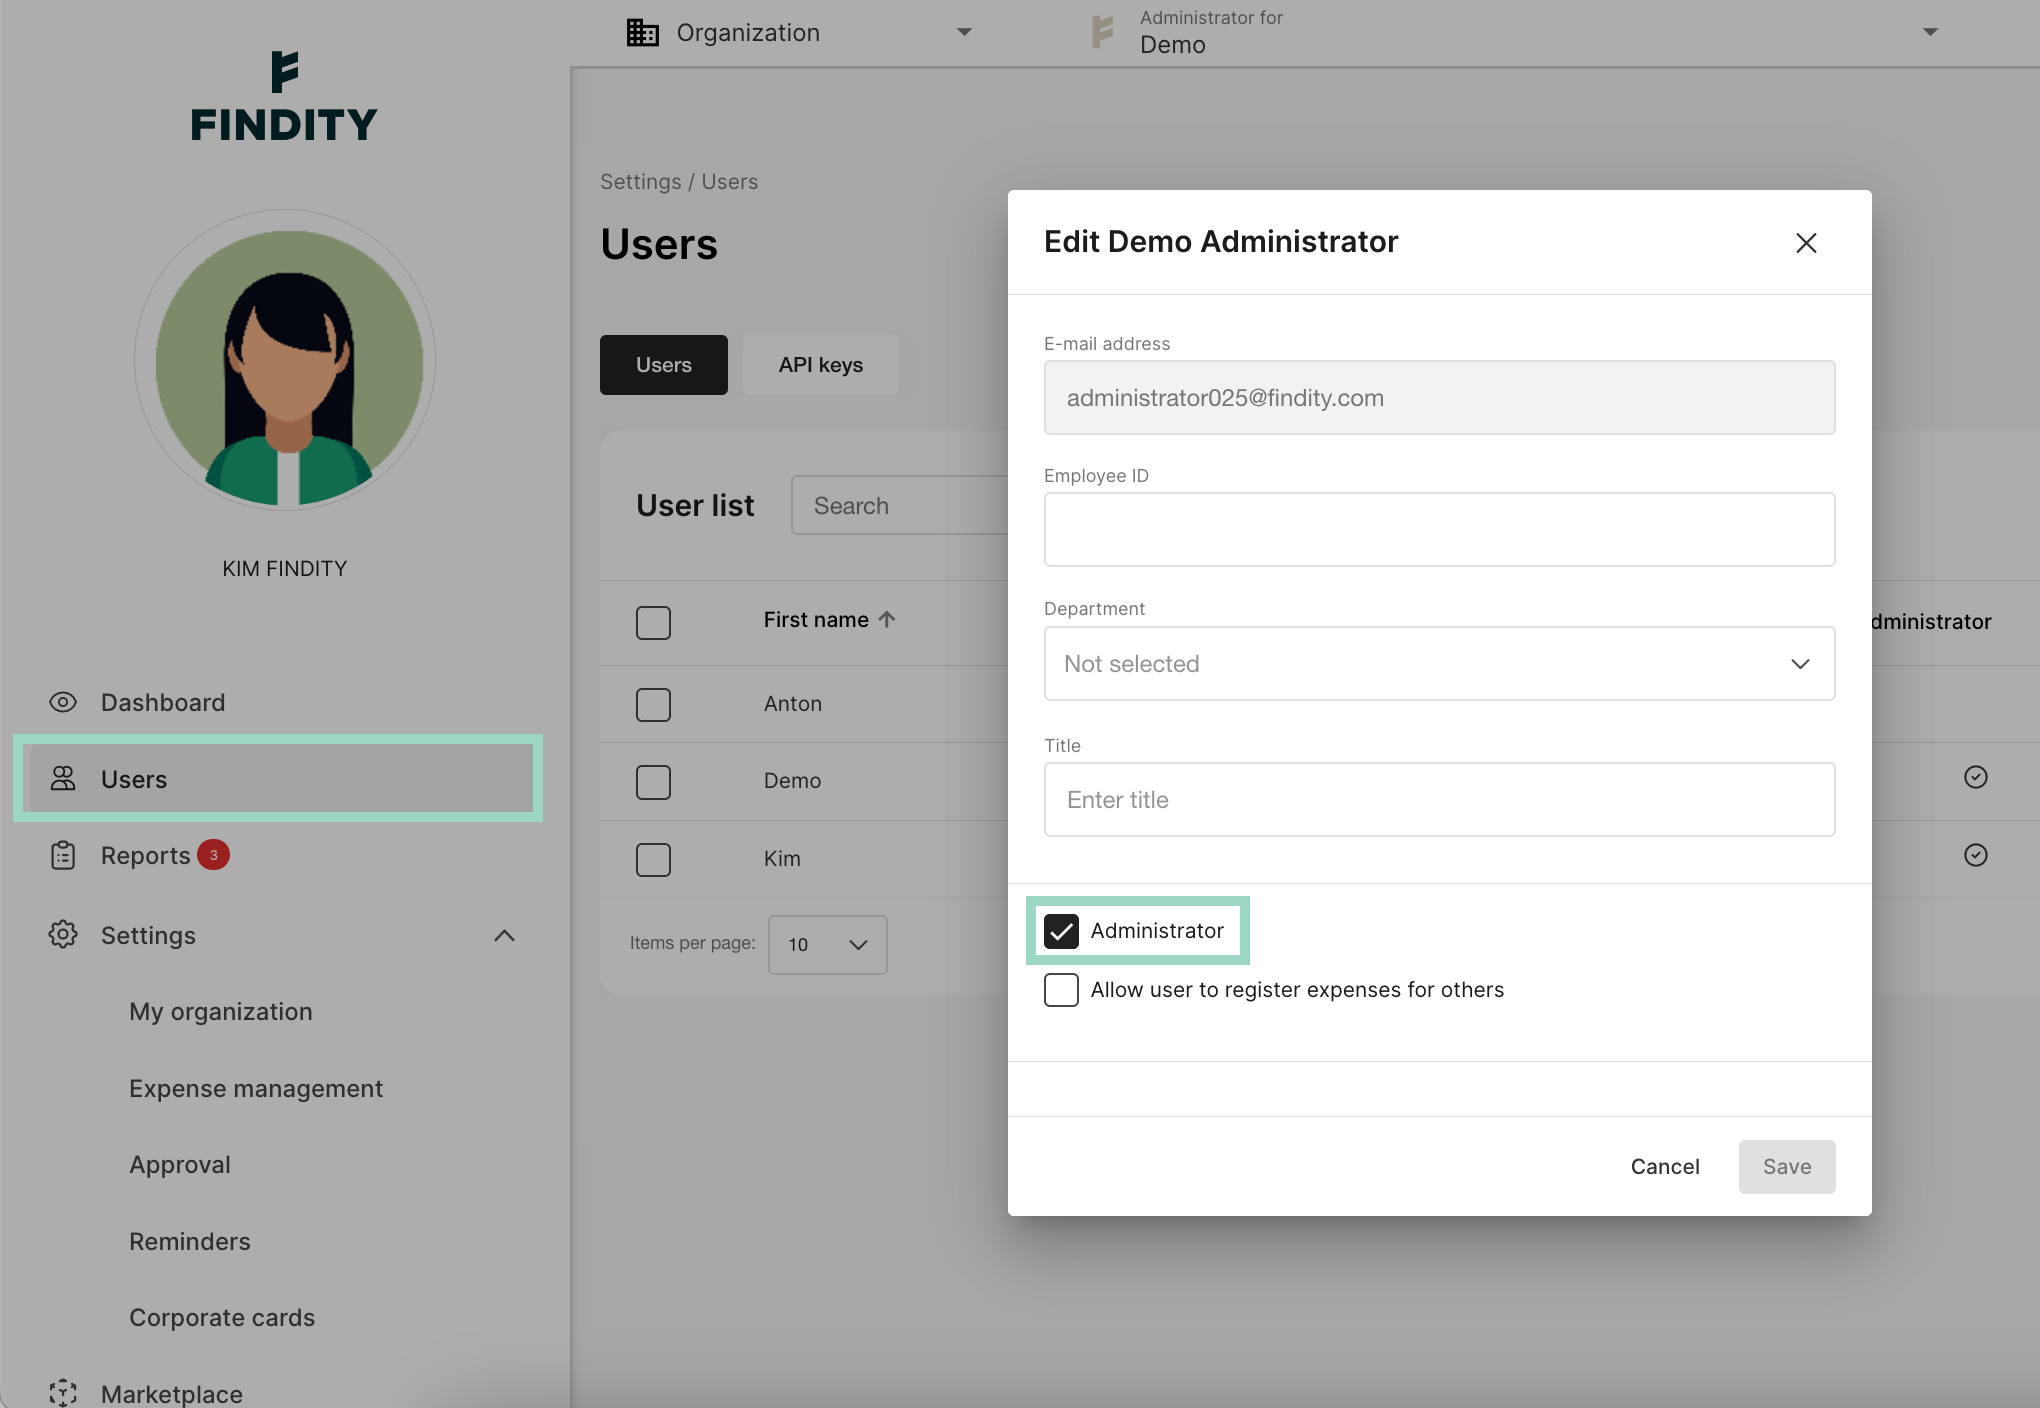
As a Findity administrator, you can assign administrator authorizations to other Findity users. To do this, click on Users. Click on the user you want to assign administrator authorizations to and mark the Administrator box and Save the settings.
Reports
It's under this category that you can manage and see the reports that the users send to the organization. This section is divided into different tabs and some of the tabs need to be activated, to be shown here.

-
Corporate card (only shown if corporate cards are activated in Marketplace) - Here is where you can see the user's corporate card reports, if the company has the payment liability. It's also possible to send reminders to the user if the invoice has been received for the invoicing period and it's time for the user to submit the reports (this function is not available if the user has private payment liability or if you use First Card real time transactions).
-
For approval (only shown if Approval is activated under Settings > Approval) - Under this tab you will see which reports, that has been sent by the user, for approval. You can also see who or which has the report for approval at the moment under the headline Approval. If there are several approvers on one report, you can click on "the eye" to see the whole report and more information about the approvers under each expense.
If you want to send a reminder to the approver(s) to handle the report, you can mark the report(s) and choose Manage reports in the blue upper menu that will now appear. Then click Send reminder in the drop-down list.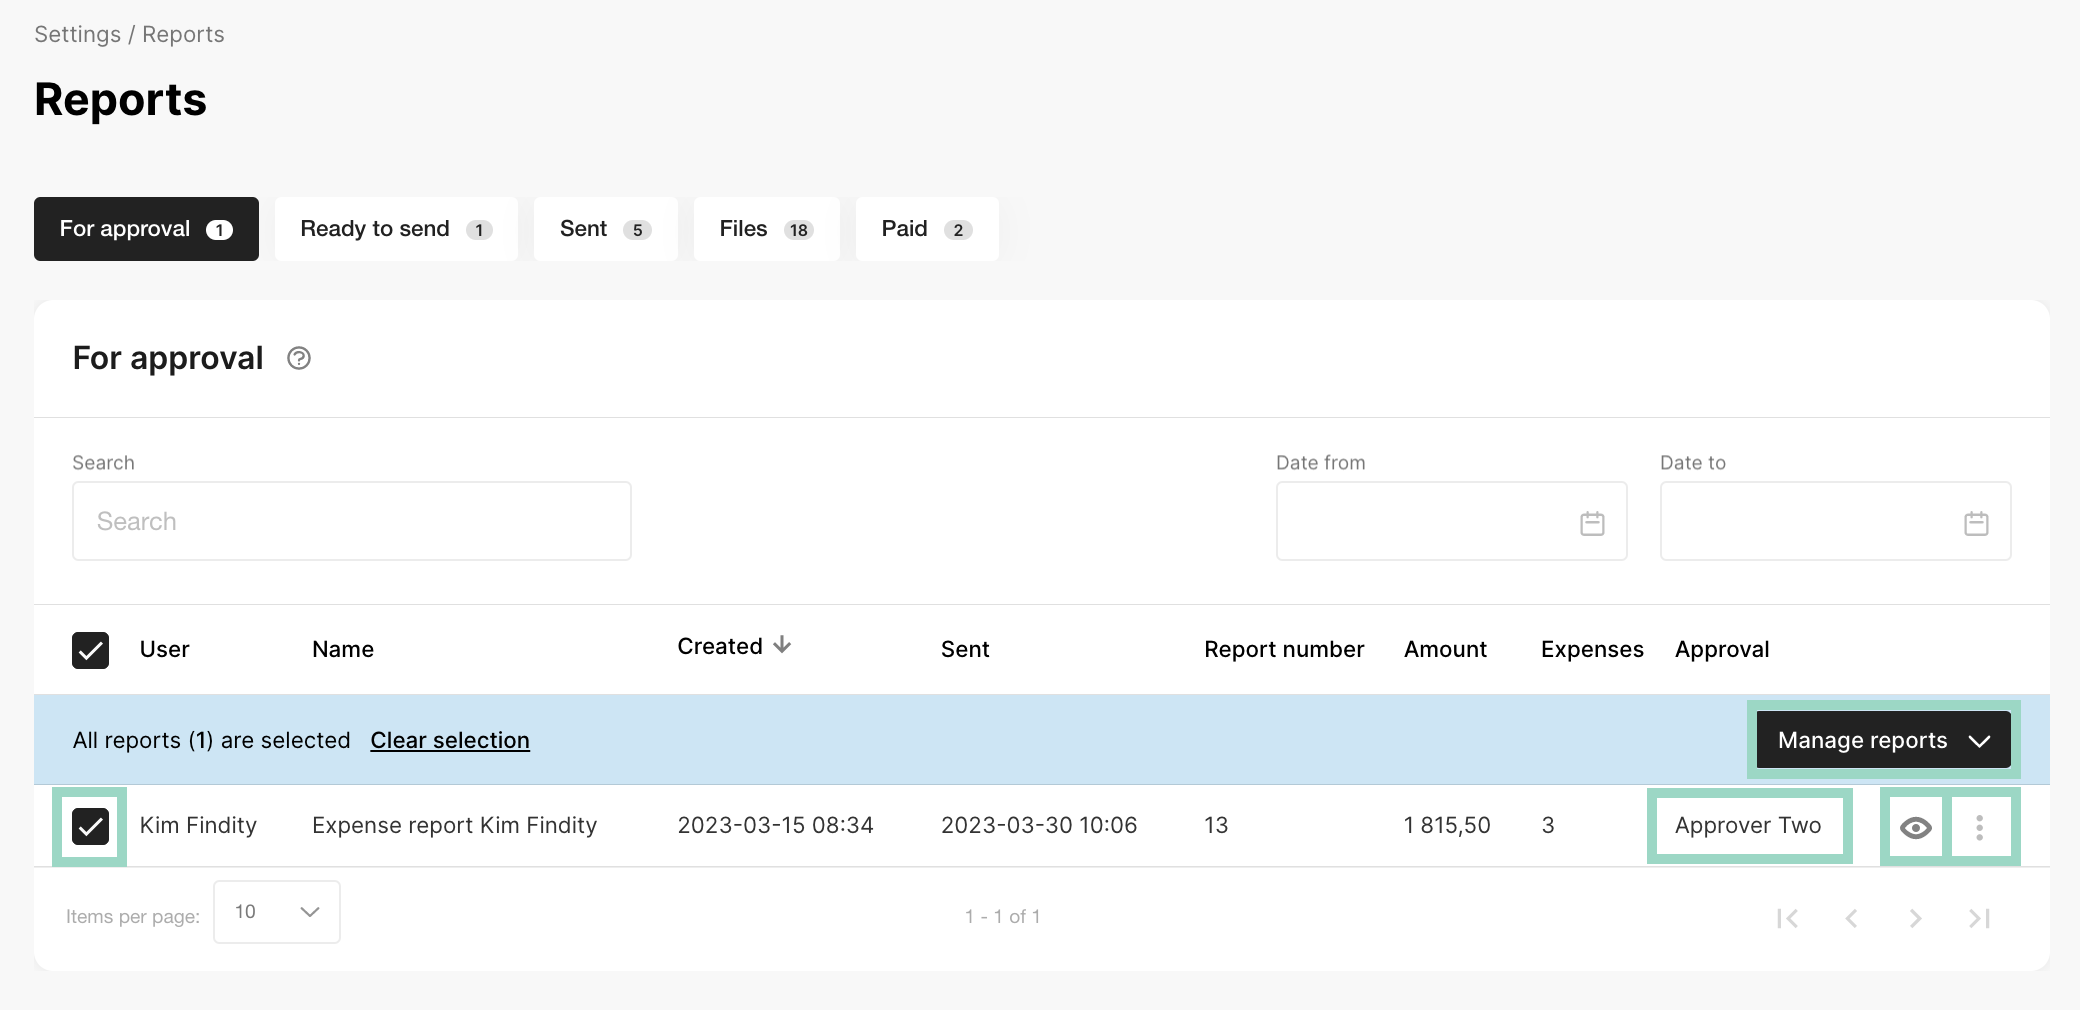
On the right-hand side, in each report field, you have "the three dots". This is where you can click to see what options you have to handle the report as an administrator. For example, if you have made a change in the approval structure for a report that the user already has sent for approval, you need to Resend for approval to make the new approval structure active on the specific report.
See all alternatives under "the three dots" here below: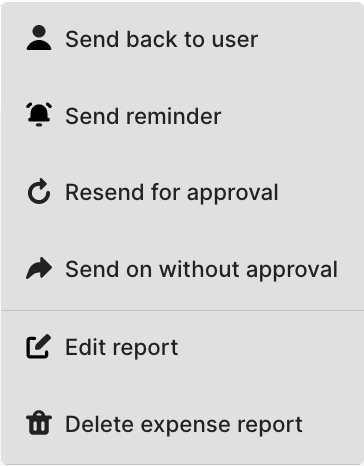
-
Ready to send (only shown if Use review mode is activated in the Integrations settings) - This is where you can review the reports after being approved or when the user has sent the report (if you haven't activated Approval), before you send the reports to your integrated report recipient(s). If you want to send several reports at the same time from this step, you need to mark the reports that you want to send and choose Manage reports (in the blue upper menu that will appear after ticking in the report boxes) then choose Send reports (and for some integrations you also need to choose booking after clicking on Send reports).
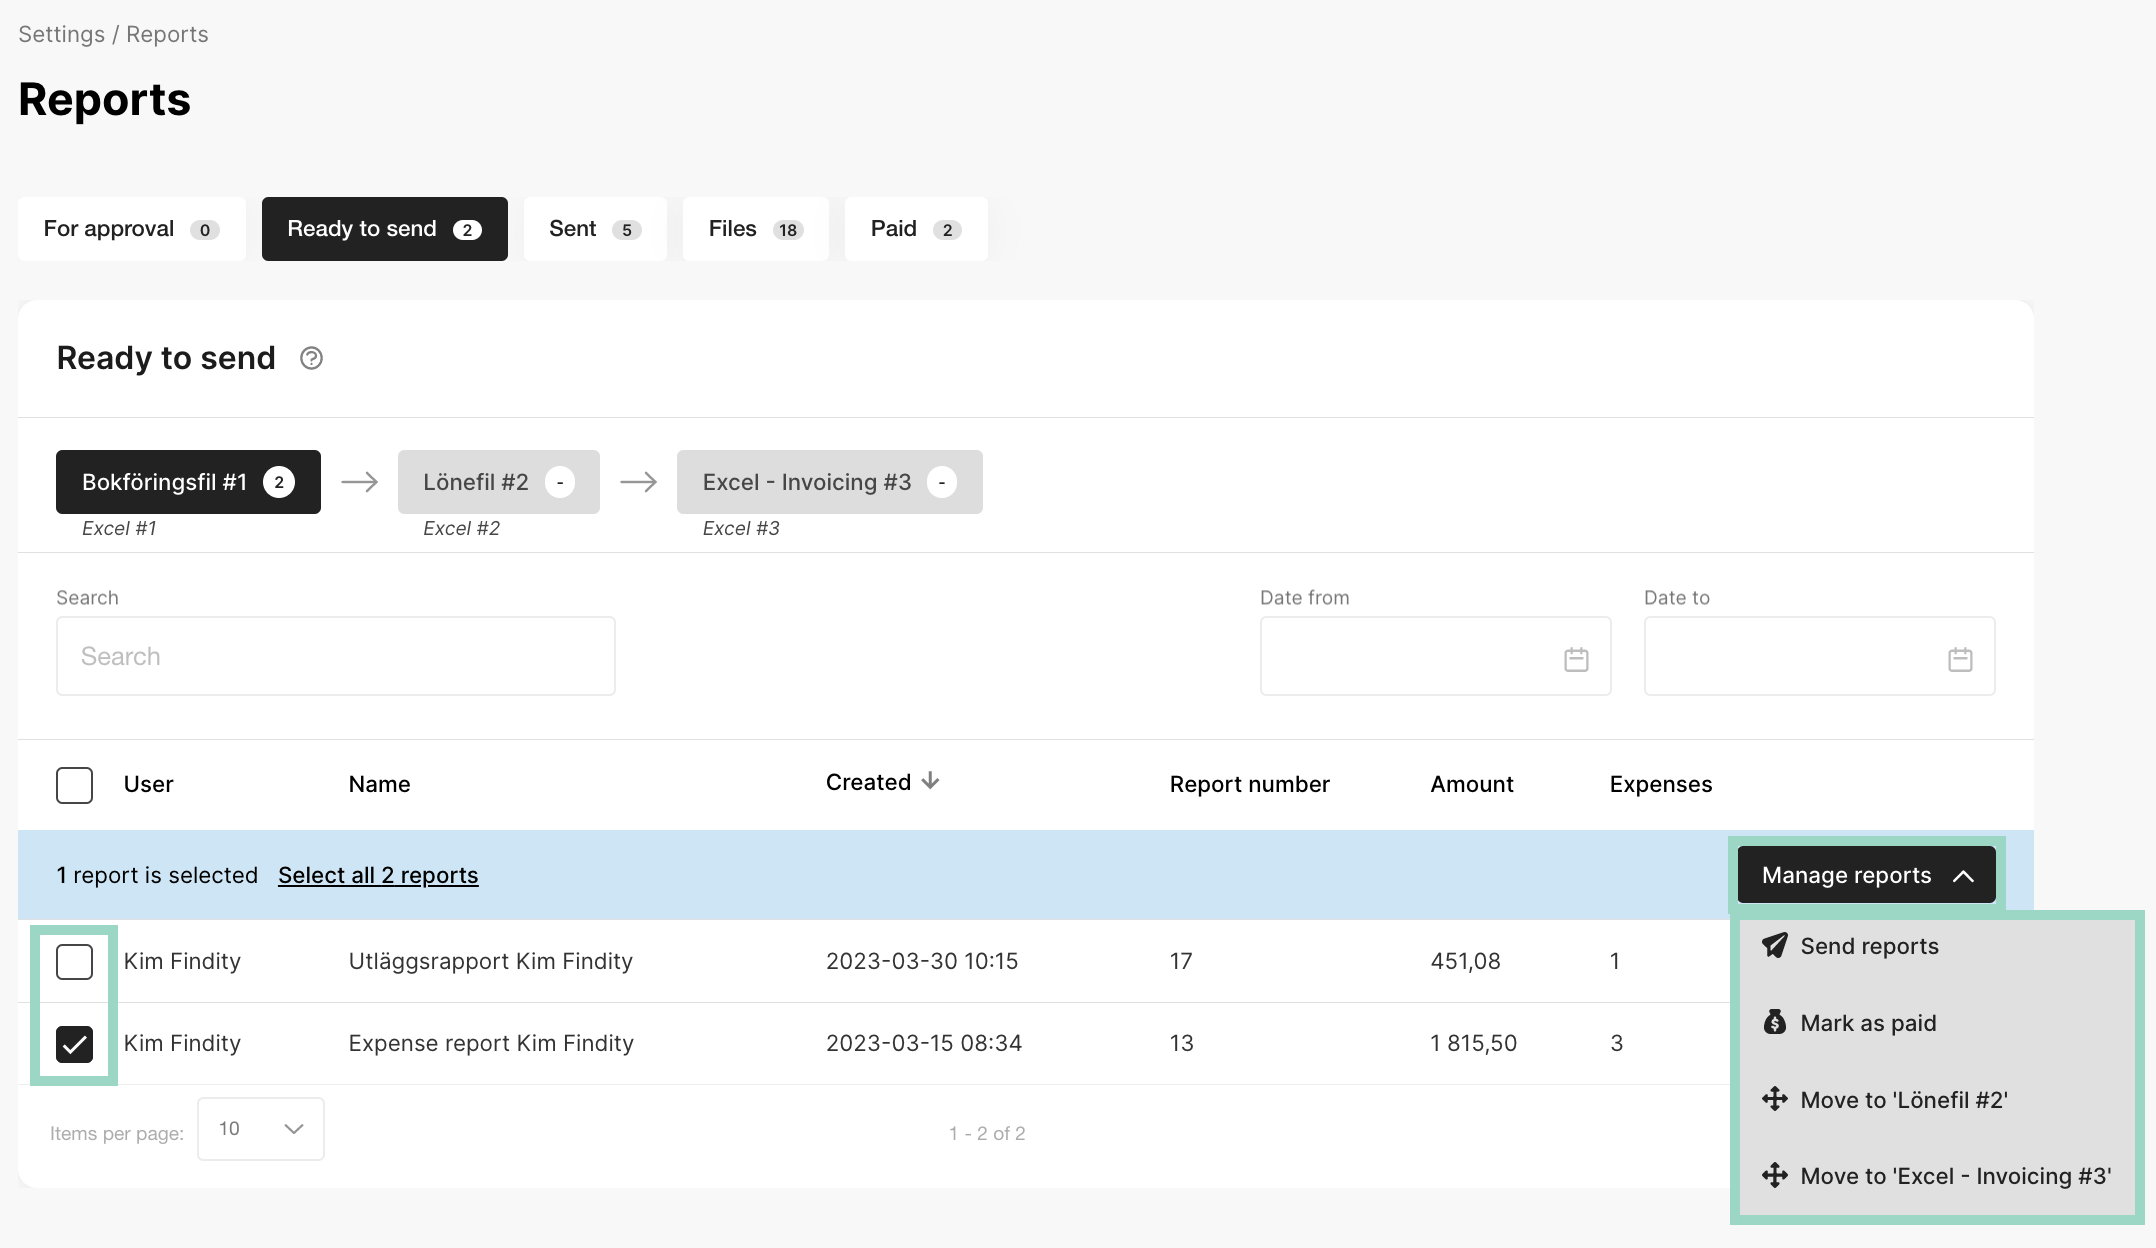
If you just want to send one report you can click on "the three dots" on the right-hand side in the report field and choose Send expense report.
If you have several report recipients, they will be shown as tabs under Report recipient. Read more about how to send reports to several report recipients here.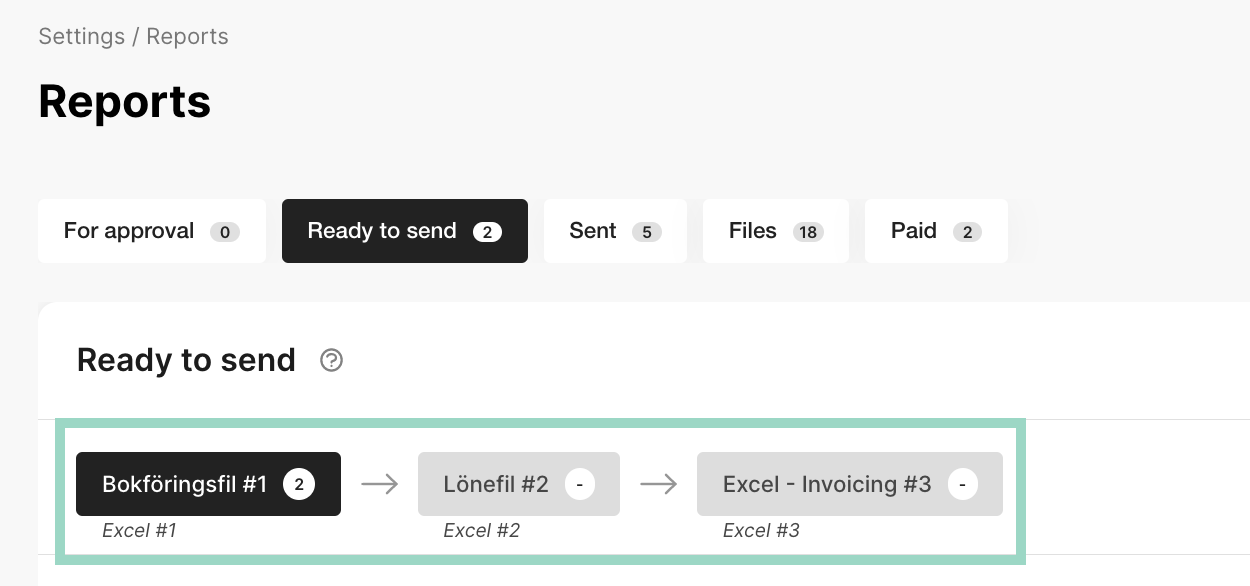
Under "the three dots" you will also have some options to handle the reports, see the options below. You can also choose to move the reports to a specific recipient if needed. If you want to skip to send the report to some specific report recipient for example.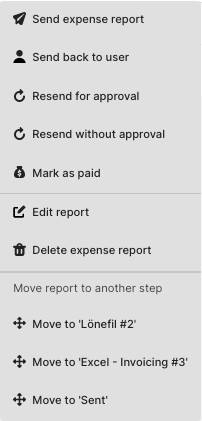
-
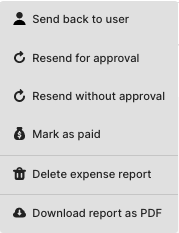
Sent - This is the only default tab that you will see if you haven't activated any other tabs for the Reports view. Here is where the reports will end up after being sent to the report recipient(s). You are also able to handle the reports under "the three dots" in this step as well. Following are your options here:
-
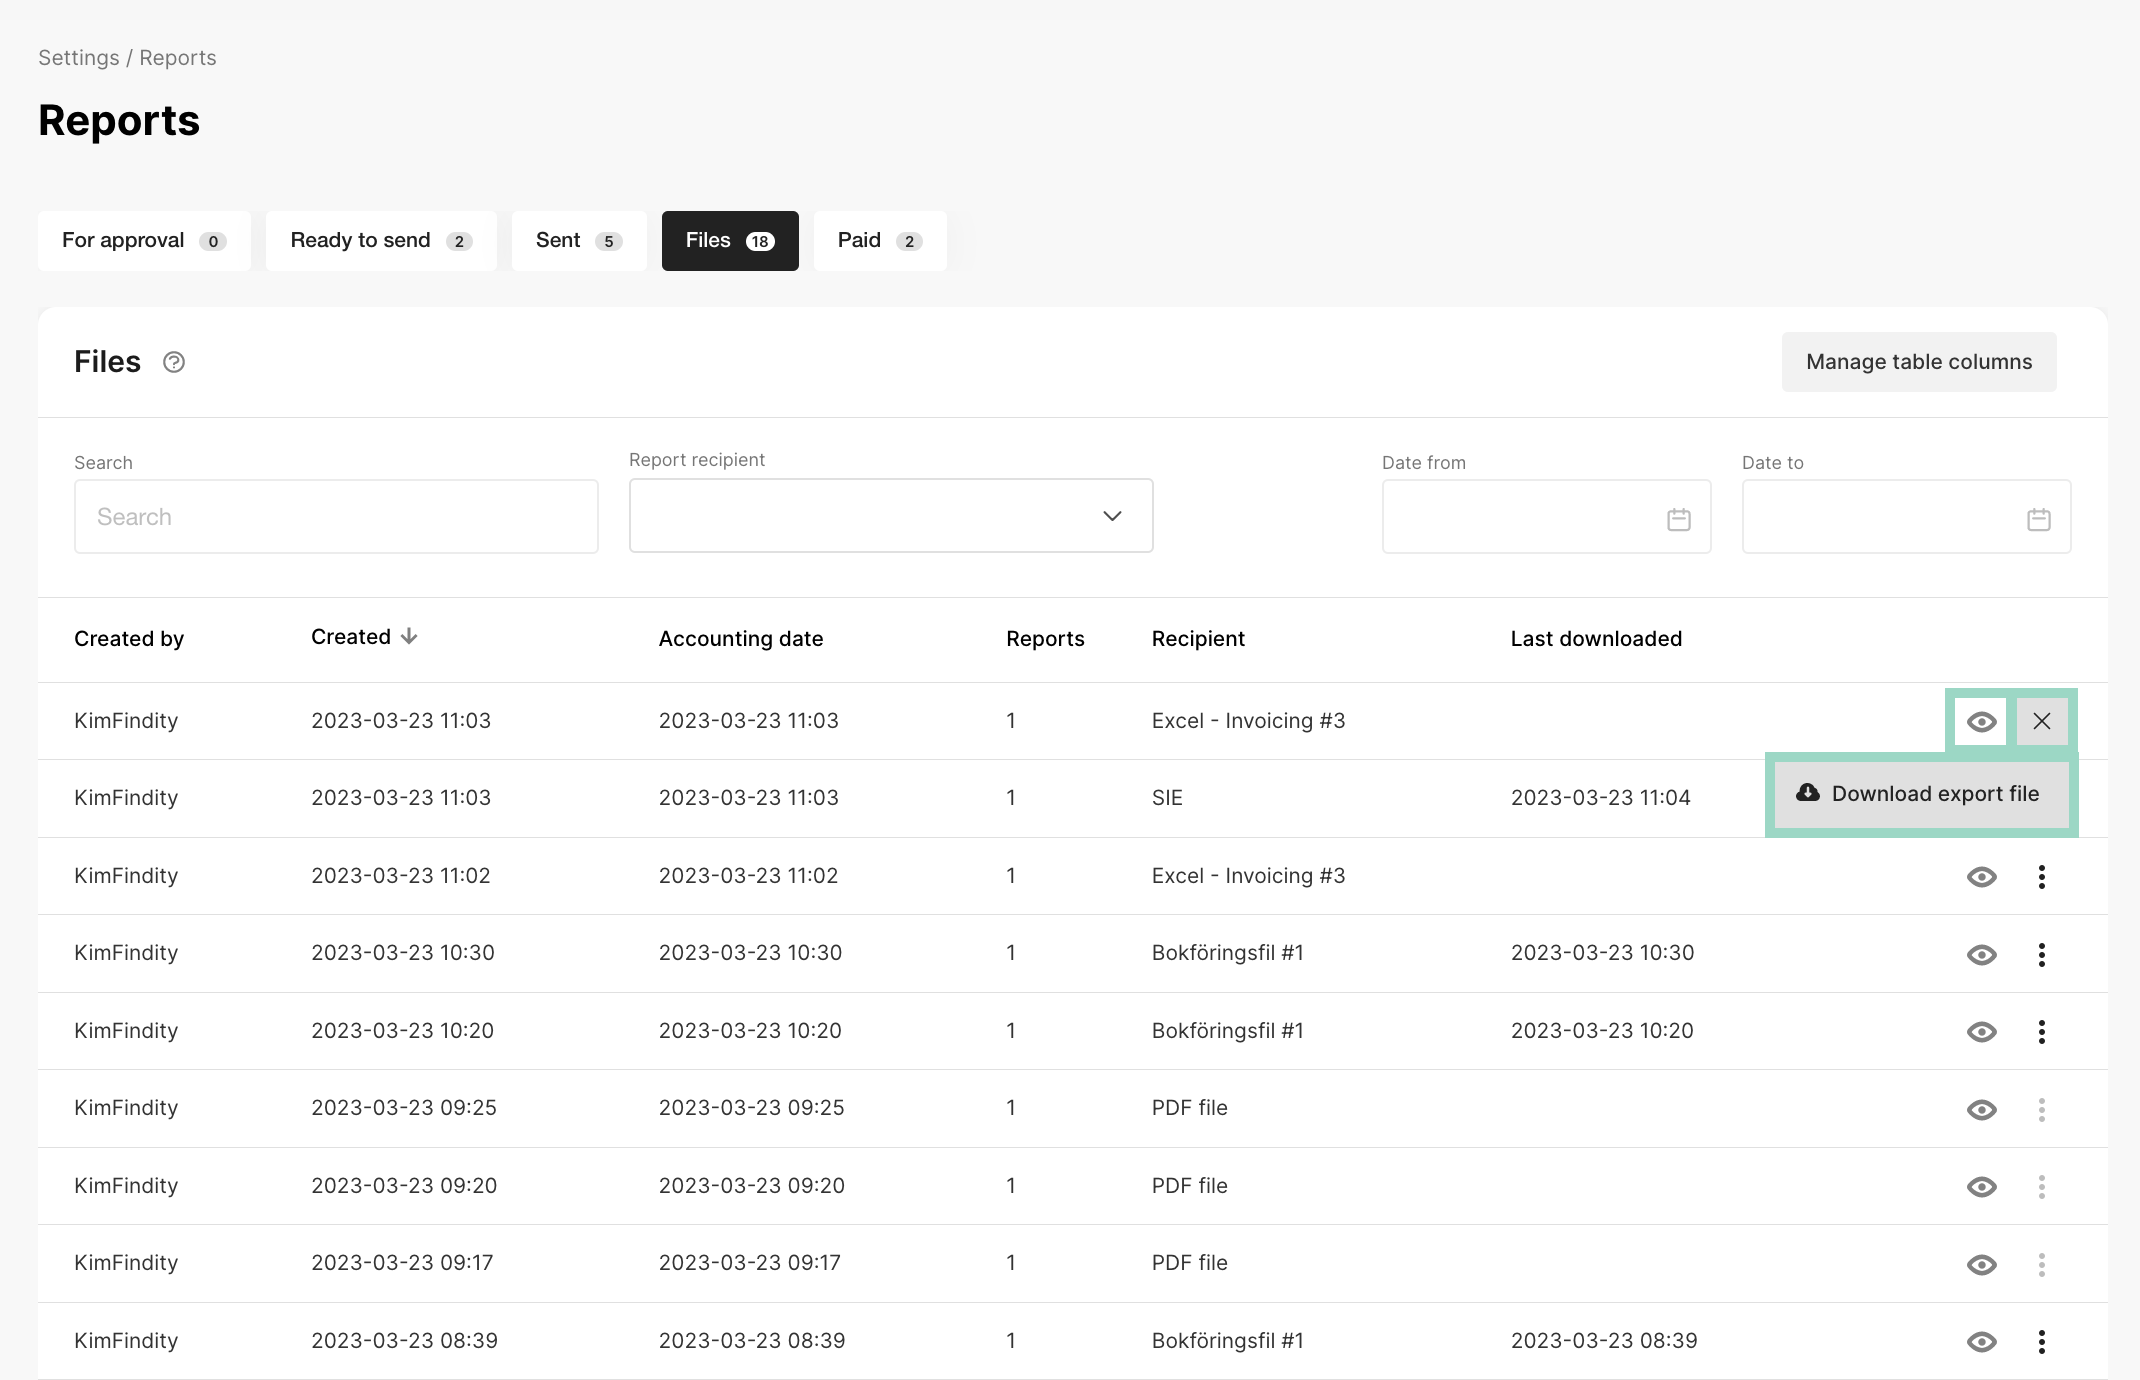
Files (first shown if, or when, you create a file) - Here you can find all of your created files. Under "the three dots" you can download the files as many times as you like by clicking on Download export file. Under "the eye" you can find a PDF summary of the reports included in the file.
-
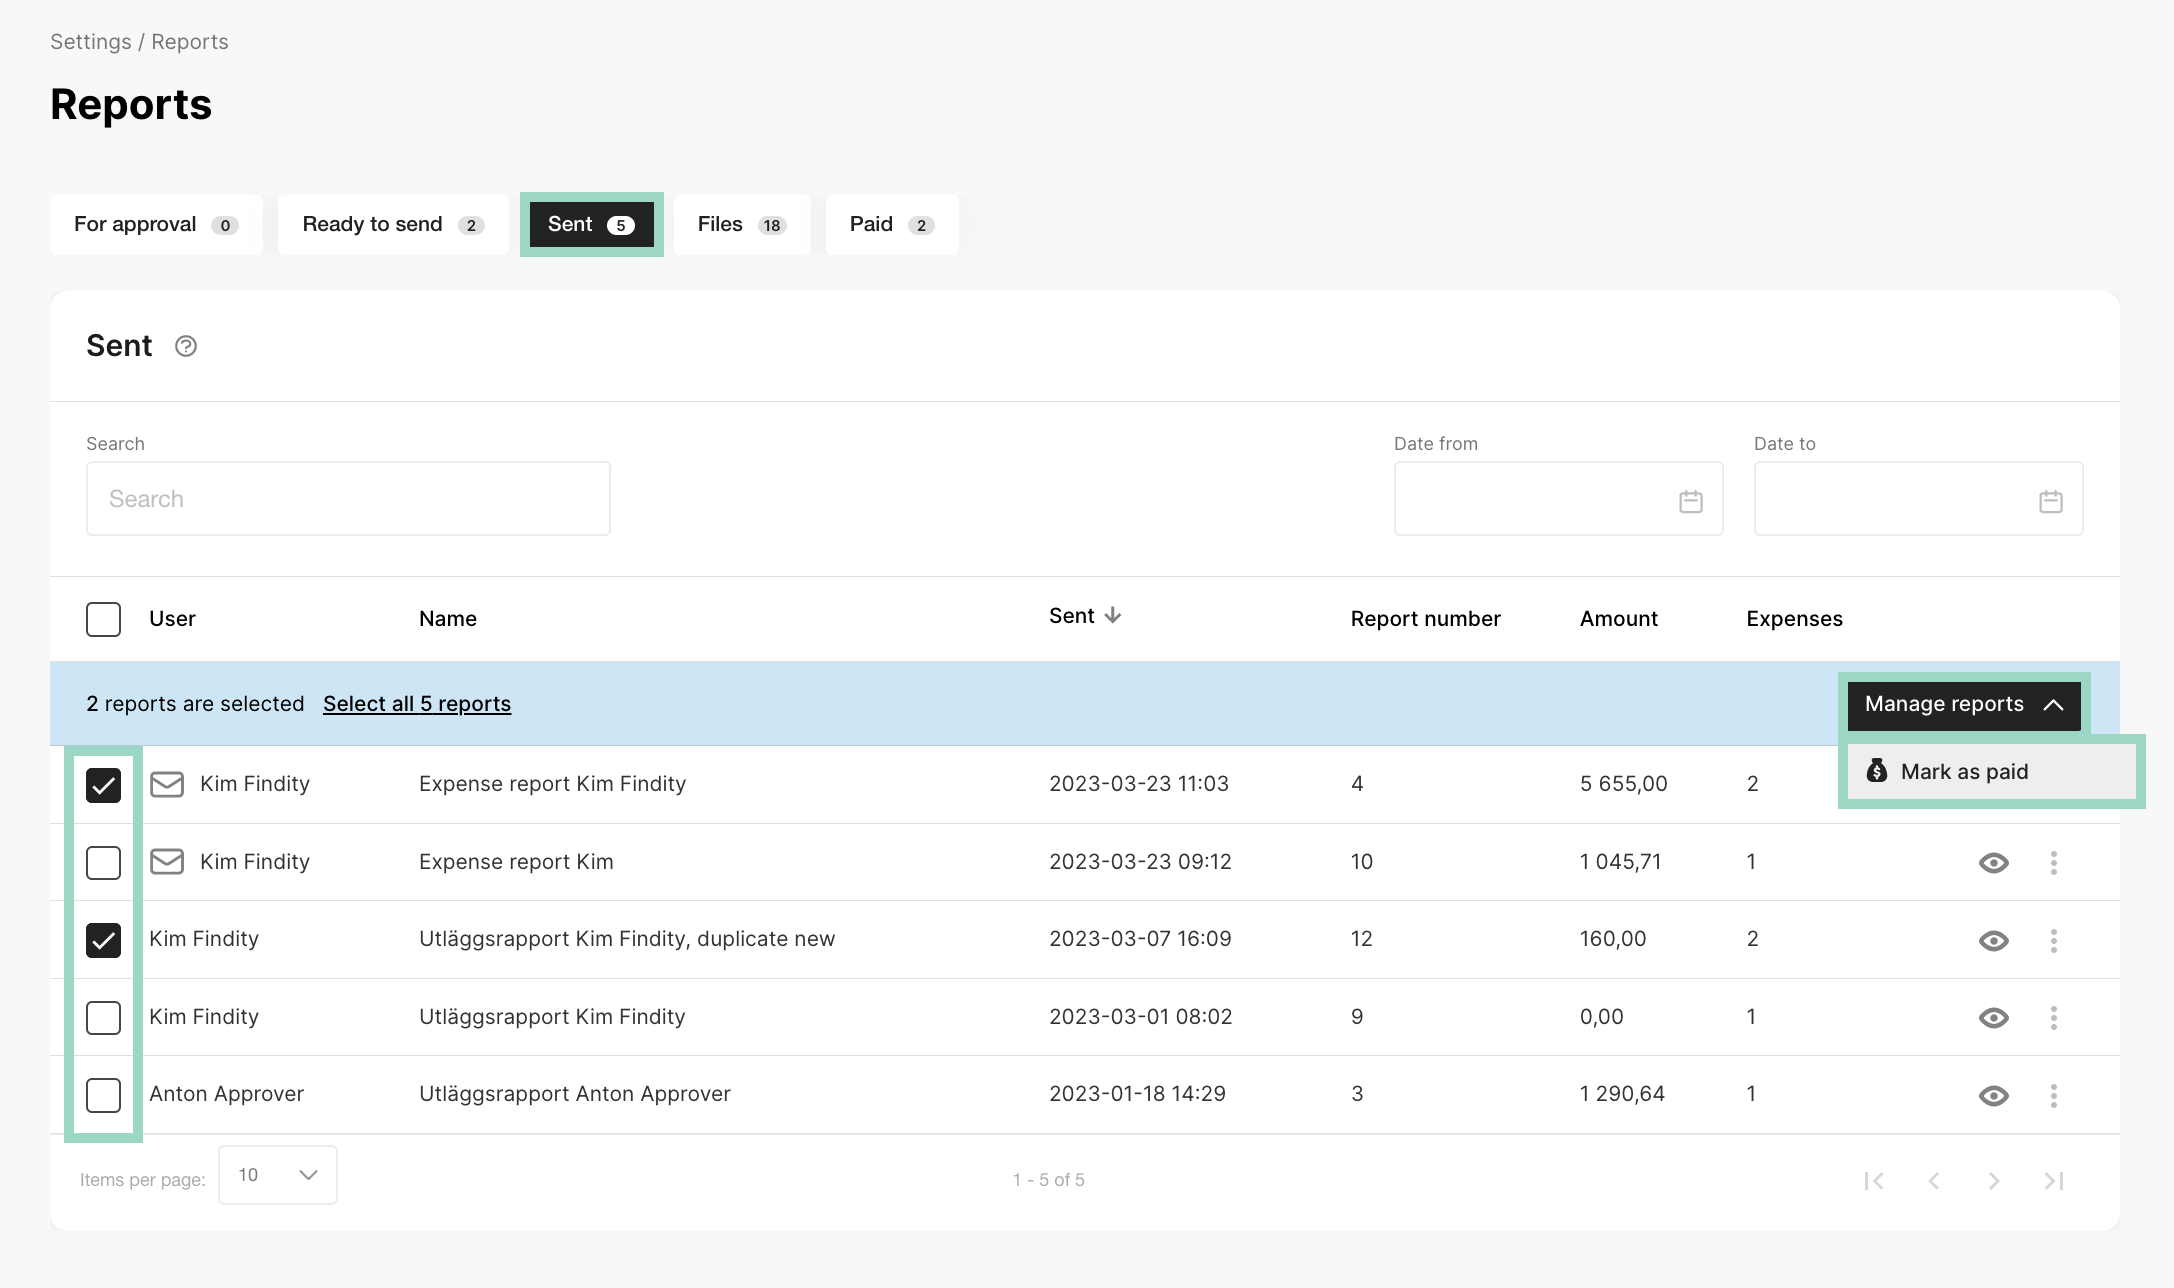
Paid (only shown if Use payment documentation is activated in Settings > Expense management > Reports workflow) - If this is activated you will have the option to Mark as paid under the tab Sent (you will have to mark the reports that you would like to move to the Paid tab). Tick in the boxes for the reports you would like to mark as paid. Click on Manage reports in the upper blue menu that will appear and then choose Mark as paid.
After you marked the reports as paid, a new window will open where you can choose to create a payment file (please note that if you already has sent the reports to your report recipient that is a payment file, a file has already been created and you will create another payment file if you choose to generate a payment file here).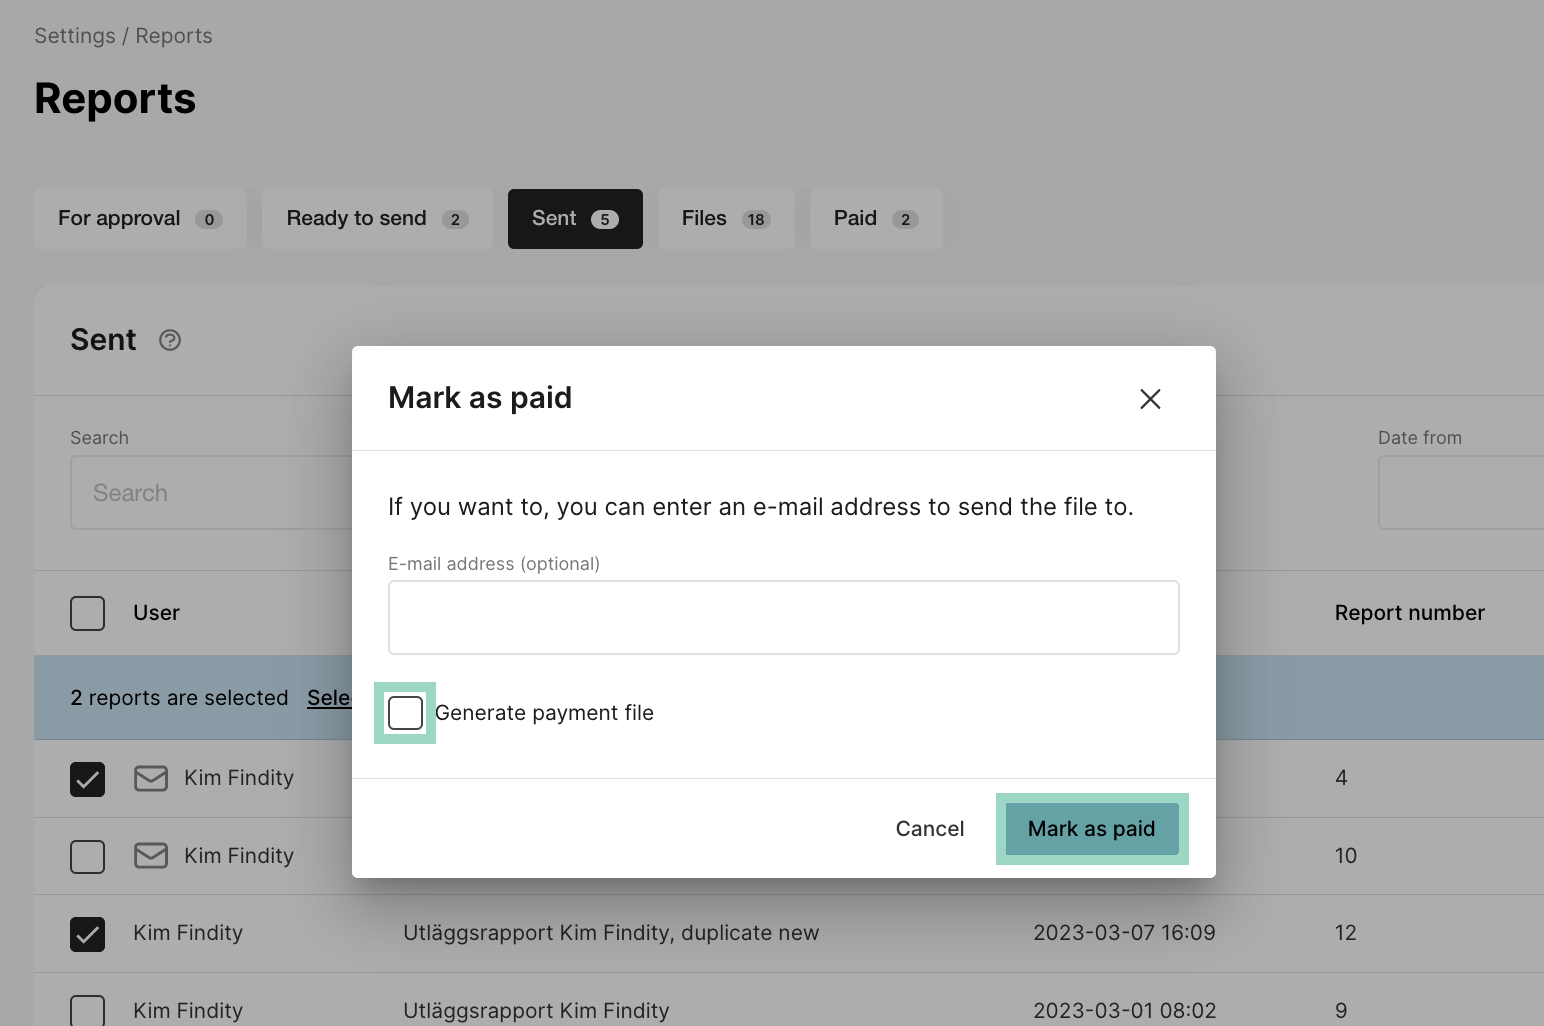
If you don't want to create a payment file, just press Mark as paid and the reports will be moved to the Paid tab.
The user will now be able to see the report under Expense reports > Paid reports in their Private mode.
Under the Paid tab you can now see the reports moved here and if you press on "the three dots" by the report you will have some options to handle the report if needed. If you press Show basis for payment you will generate a payment basis for the specific report. You can also choose to tick in several reports and click on Manage reports (in the upper blue menu that will appear) and then choose Show basis for payment, to generate a payment basis for all of the chosen reports. If you click on "the eye", a new window/tab will open where you can see the report.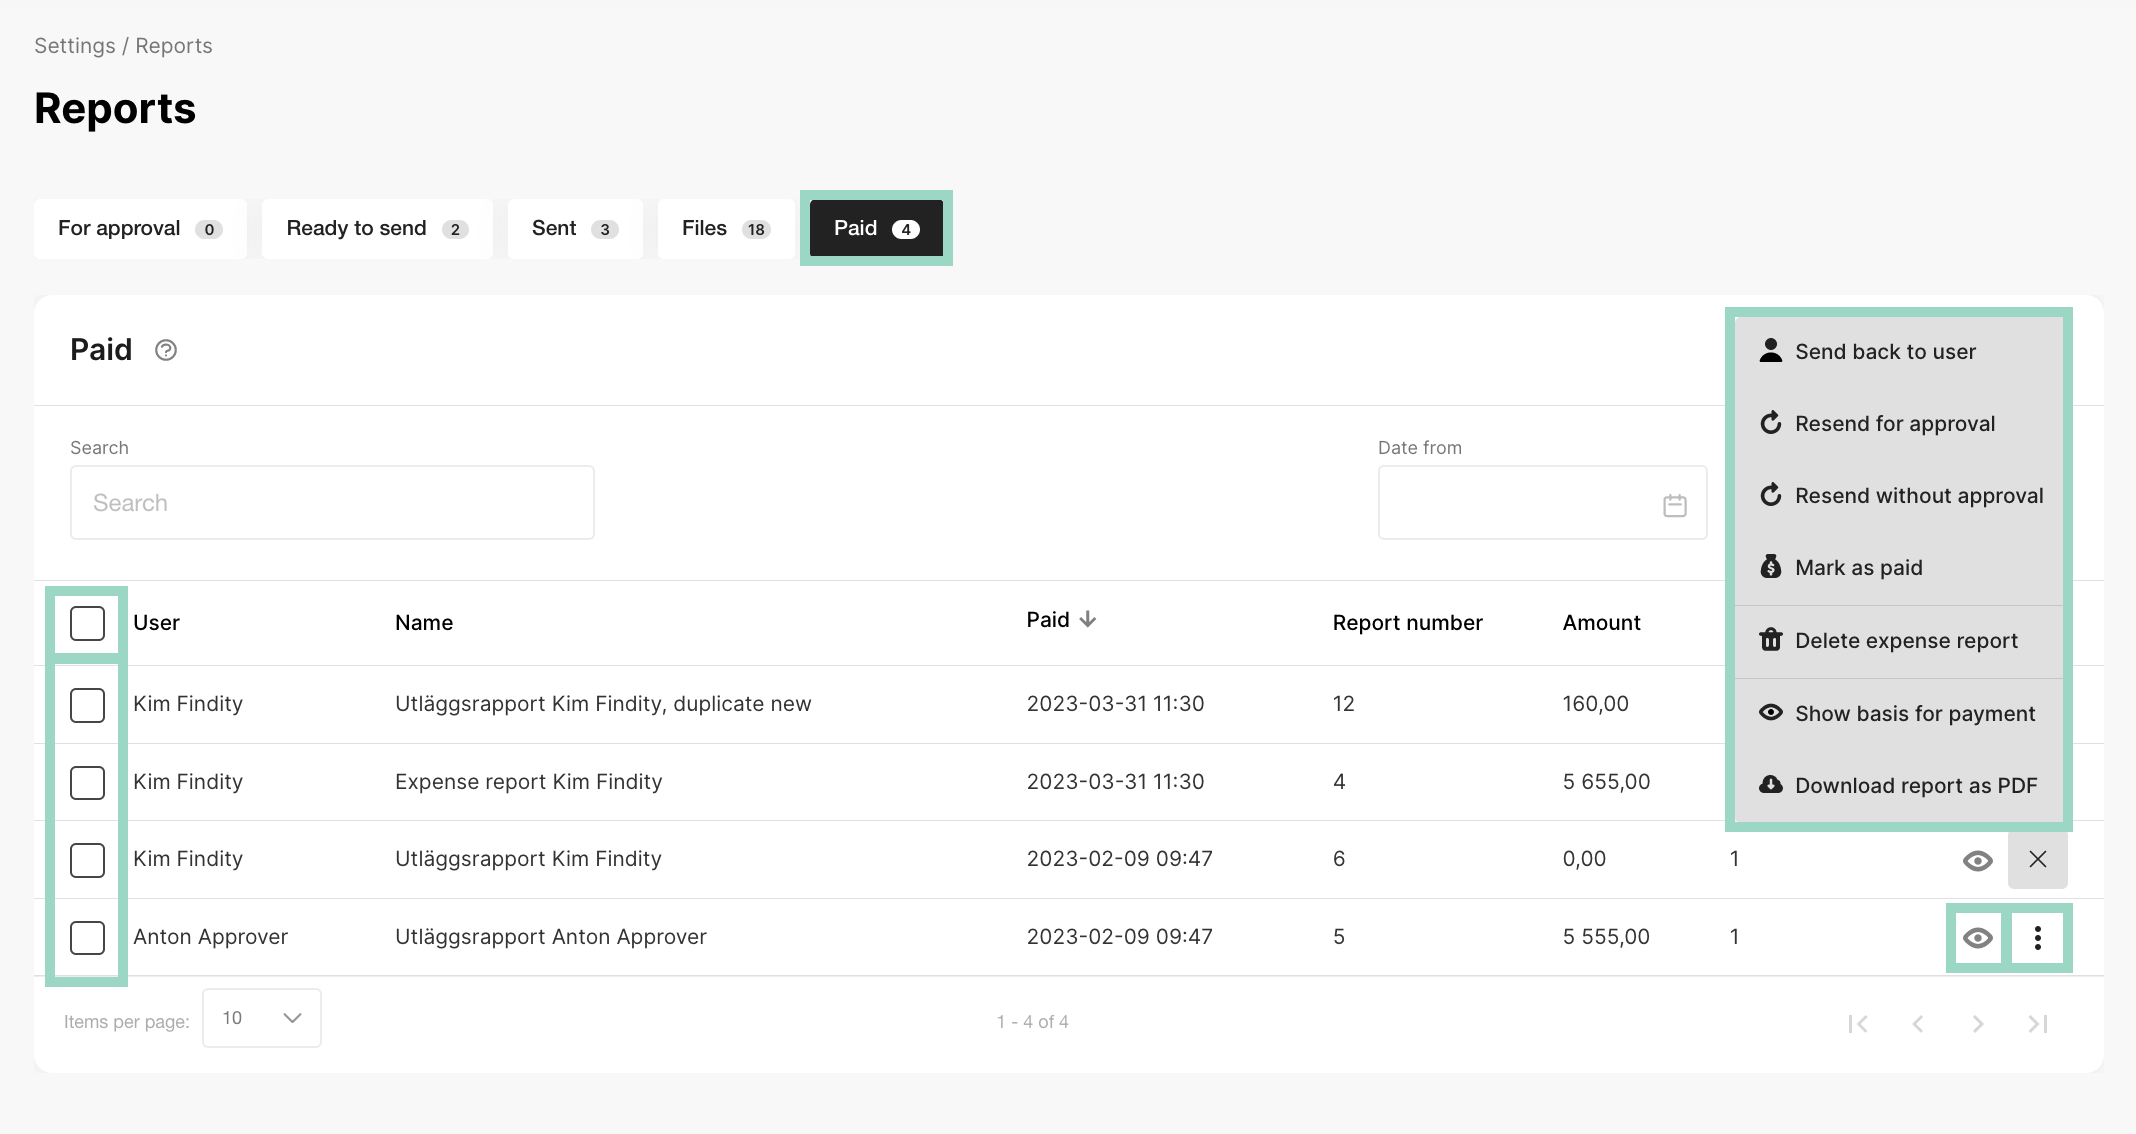
If you have activated the function Allow administrators to edit reports under Settings > Expense management > Reports workflow, it's under For approval and Ready to send that you can make changes to an expense (please note that this function is not available for mileage and per diem). To get to the editing mode in the expense report, click on the report name and then click on the specific expense and the expense will open for editing. See more detailed information about the Ready to send-tab here.
Settings - My organization
My organization is divided into four tabs:
- Company details - Here you can enter information about the organization name, address and default language. Only the company name is visible to users, in the app and on reports.
-
Organization structure - An organization can have departments (which can have sub-departments) and this is where you add the structure that you would like. The departments can be used to control how the approval is handled within the organization, in which case you also need to assign a department to each user in the user settings.
Also, you can choose VAT settings for each department: VAT liable, VAT exempt, or inherit VAT settings from expense categories. In this article, you can read more about how to add an organization structure. - Design - Here is where you customize Findity to your own logotype and the background, that will be shown for all the users of the app in your organization.
- License information - Here you will find information about invoicing and payment method for the organization and also a summary of the organization's license types, and the number of licenses in use. You can select the month for which you want to see license statistics.
Settings - Expense management
Here is where you make the most of the settings for the expense management in your organization. It's divided into the following tabs:
-
Integrations - This is where you add and manage Integrations, Charts of accounts, Salary types and Payment methods. Read more about the different categories here below and click on the links to see more specific information about each category.
Integrations
Findity is flexible regarding settings. Select the report recipient you want to send the reports to. It can be an accounting program, payroll program or regular PDF. If you want to send reports to more than one recipient, you have the opportunity to add them all. If you use several report recipients, keep in mind that the reports can be sent in parallel, and carefully check the settings for each recipient.
For each recipient type you can define the person and system that should be the recipients of the reports. Based on which recipient you have, different report settings can be set. If you use a financial system, you can, for example, specify how all expenses should be booked and which dates they should be posted on.
Here is also where you choose which expense types that should be sent to which report recipient. Under Choose expense types to include for each report recipient is where you will have to tick in the boxes for which expense type that should be sent to the specific report recipient.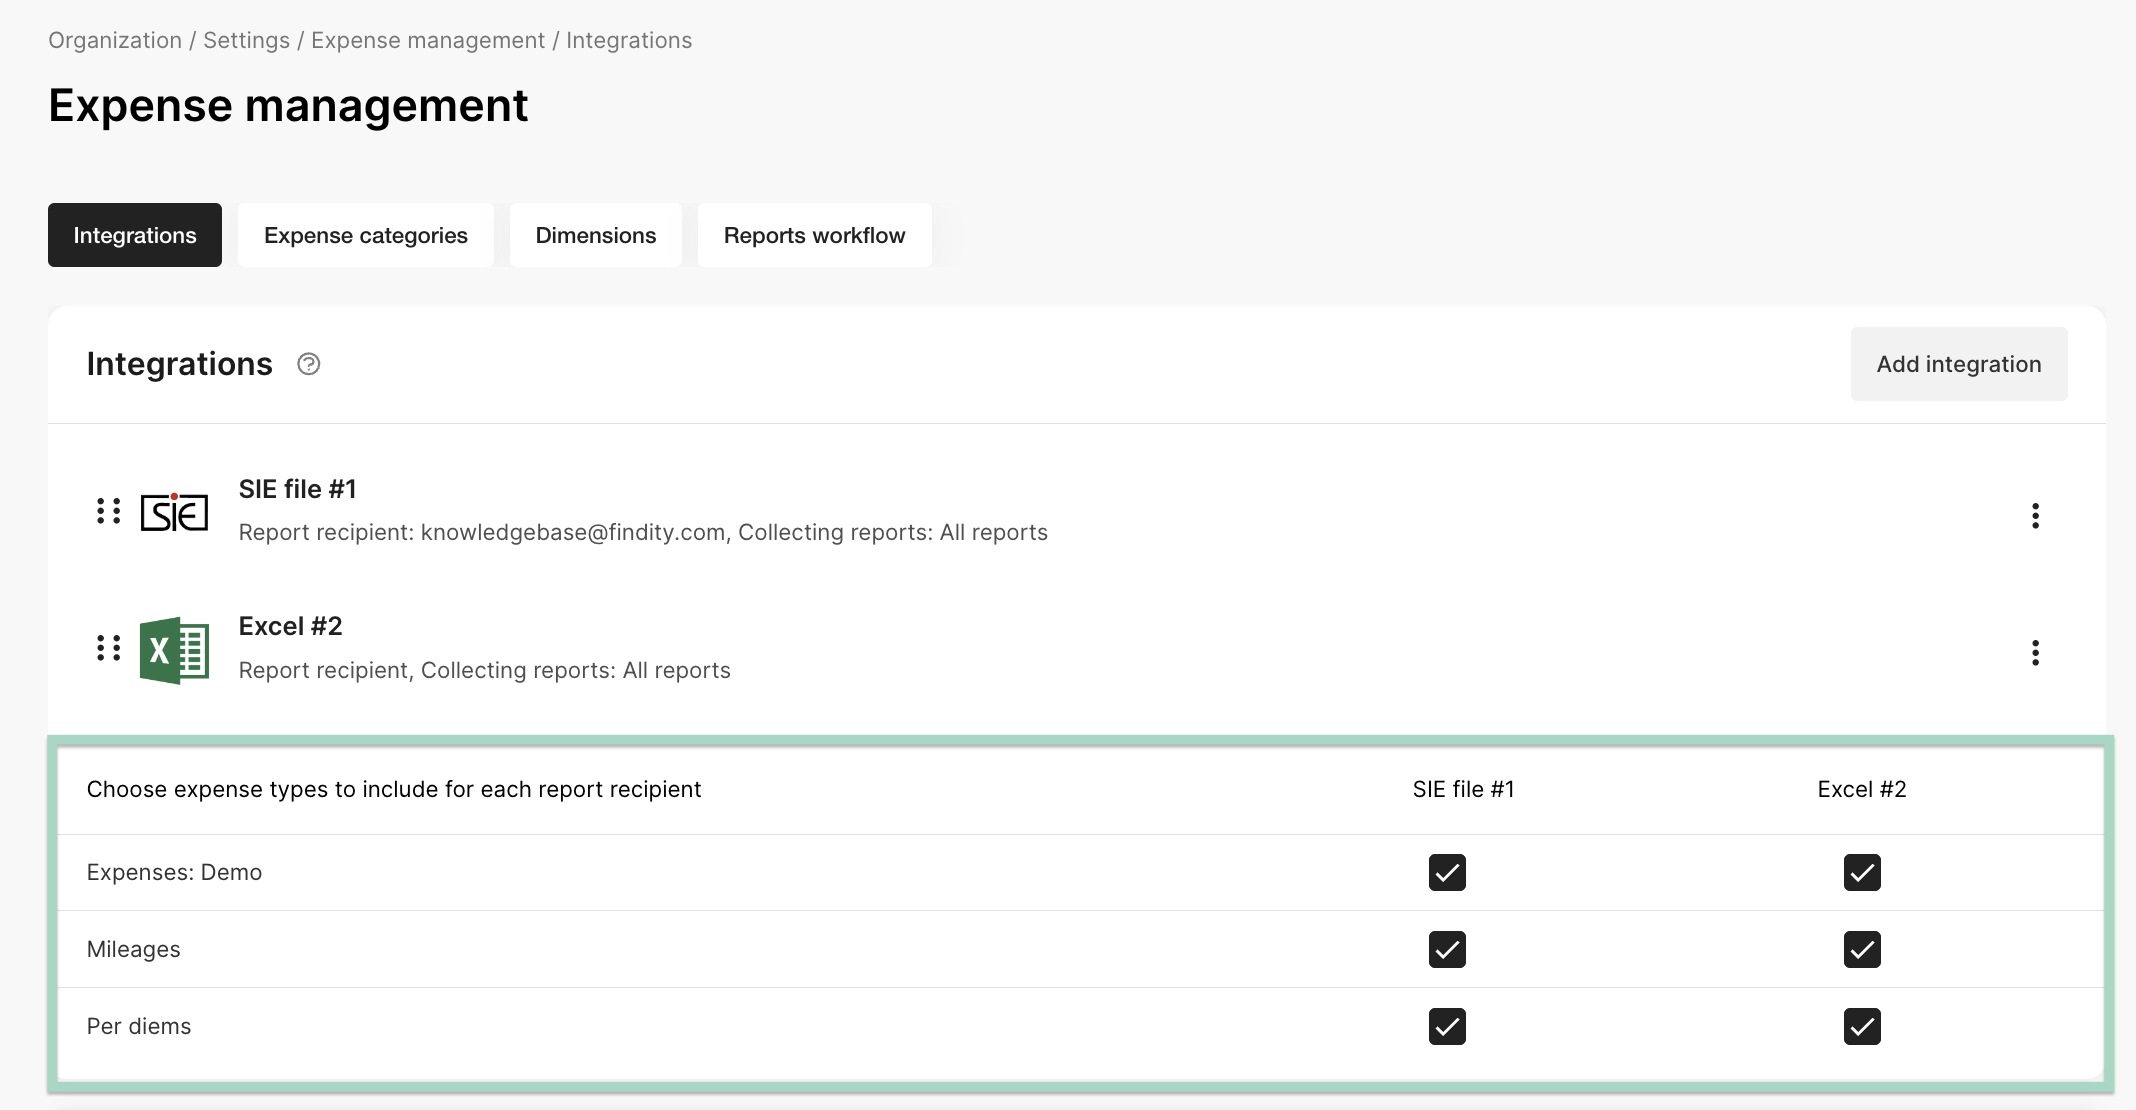
See related articles for this category on the links here below:
Where can I see which integrations that is available to choose?
How does the system work if you have multiple integrations?
Can I add/change the integration?
Where do I add my e-mail as a recipient when reports is available to be handled at the organization?
Chart of accounts
The chart of accounts is used in the expense categories (debit accounts) and for payment method (credit accounts), if you have an accounting recipient. All accounts that are available here are specified for the respective expense category (that is set under Settings > Expense management > Expense categories).
If the report recipient is a system that is connected through an API, these objects are updated automatically by the external system. If not, you can easily manage the accounts in this column by clicking on the "three dots" on the right-hand side and choose Edit.
Here is also where you choose your tax account.
See related articles for this category on the links here below:
Why do I need the chart of accounts?
Can I download a list of the accounts that are available on our organization?
Salary types
The salary types are used in the expense categories if you have a salary recipient. All salary types that are available here are specified for the respective expense category (that is set under Settings > Expense management > Expense categories).
If the report recipient is a system that is connected through an API, these objects are updated automatically by the external system. If not, you can easily manage the accounts in this column by clicking on the "three dots" on the right-hand side and choosing Edit.
Here is also where you choose the salary type for VAT.
See related articles for this category on the links here below:
How do I import/set up new salary types?
Payment methods
An organization can have multiple payment methods. The payment method controls the account to be credited for the expense. For example, it may be "Corporate card" and "Private expenses" which respectively are connected to the correct account in the bookkeeping. The payment methods then appear as options for all users.
You also can choose to use personal payment methods if you want to have different accounts for different employees. Personal payment methods are then linked to a specific user and can then only be used by the user who has the payment method linked to them.
See related articles for this category on the links here below:
What are payment methods?
How do I manage payment methods for the users? -
Expense categories - Expense categories are used for automatic accounting and the users need to add the expense category for every expense claim. You can configure your own expense categories in this section. Here is also where you can what input fields that should be visible and mandatory/not mandatory for the users when creating an expense, this is editable under Edit more input fields.
Findity has the following default types of expense categories:
General expenses - Used for the most common expenses such as parking, tickets, accommodation etc. For this category, it is only possible to define a single expense account.
Entertainment - Used to set up expense categories of entertainment. It is possible to specify accounts for deductible and non-deductible entertainment.
Per diem- Support is available for both domestic and international per diem. You can define separate amounts for each country.
Mileage - Support for different car types. It is easy to specify the amount to be paid, and which accounts should be used for the tax-free and taxable parts.
If you press Add category, you can also add a category for Benefits (used for meal benefit) and Abroad purchase expense.
See related articles for this category on the links here below:
"Edit more input fields" - settings for categories, dimensions and validations
Where can I create a new expense category?
How do I turn off VAT for the organization?
How do I change mileage amounts?
Can I choose what should be mandatory for the user to add in the expense?
How do I add yearly budget for a category?
Can I change the tax-free remuneration for mileage?
-
Dimensions - Here you can configure dimensions for example cost centers and projects. Dimensions are optional, and you can use one or more. Their values can be predefined or selected by the user. Dimensions can be applied to a full report or to each expense. There are many ways to customize the dimensions as you would like to have them for your organization.
See related articles for this category on the links here below:
How do I manage projects for the users?
How do I manage cost centers for the users?
-
Reports workflow - Here you manage the settings related to the flow of reports and receipts. You can also find "Advanced settings" where you can, for example, set the accounting currency and choose not to post VAT for foreign receipts.
If you would like every report to have a report number, you can set this up here under Report number series.
See related articles for this category on the links here below:
How do I add the tab "Paid" under reports?
Can I add a setting with how many expenses the user can register in a report?
-
Fuel benefits (only shown if Fuel benefit is activated under Marketplace) - Here you will do the settings related to the fuel benefits.
See related articles for this category on the links here below:
Activate fuel benefit
Settings - Approval
If you would like to have employees as approvers for other employees, this is where you will manage the settings for how you would like the approver structure to work.
Approval can be done by a specific person (default approver) or according to the organization structure or dimensions. At department level or dimension, it is possible to set amount limits per person. It is also possible to require approval from more than one person.
See related articles for this category on the links here below:
How do I set up approvers?
Temporary approver
Settings - Reminders
This function is used to send reminders to users or approvers within the organization. Write a title and a message, decide which date to send it, and whether to repeat it or not. The reminder can either be sent once or repeated every day, every week, every other week, or once a month. Finally, decide whom to send it to: all users in the organization, users with an ongoing report, or approvers that have reports to attend to.
DeleteSettings - Corporate cards
This page shows all users with corporate cards. If the cardholder is shown in italics here, the card connection is not yet verified by the bank.
Please also note that corporate cards are an additional service that needs to be activated in Marketplace.
How do I connect our organization to corporate cards?
How do I cancel the connection to corporate cards on the organization?
Activating bank integration (Nordea First Card Real Time)
Marketplace
Findity provides many additional services that you can integrate with your Findity account, like connecting your corporate cards, fleet management, digital receipts etc. Here is the place where you can activate/deactivate these services.
There are also some free-of-charge functions that can be (de)activated - for example; Approval, Split expense and Duplicate detection.
See related articles for this category on the links here below:
What is Marketplace?
Support
Press Contact us to be directed to your e-mail provider to send an e-mail to our Customer support, for all questions you may not find here in our Knowledge base.
Delete